Blog Archives
Mütter Madness: a Museum of Medical Oddities
30 Days To A Blog Challenge–Day 10
Dare to Be Disturbingly Informed!
361 days a year, The College of Physicians of Philadelphia opens the doors to The Mütter Museum for those with a morbid curiosity for medical oddities. According to the museum’s website:
America’s finest museum of medical history, the Mütter Museum displays its beautifully preserved collections of anatomical specimens, models, and medical instruments in a nineteenth-century “cabinet museum” setting.
The goal of the Museum is to help visitors understand the mysteries and beauty of the human body and appreciate the history of diagnosis and treatment of disease.
Fortunately for me, the museum is only about two hours away, so a day trip was in order. Since the museum’s exhibits are mostly displayed in Victorian ‘cabinet’ style, my traveling companion and I chose to travel Victorian style, too, via train.
As soon as I walked up the marbled steps to the huge wood doors, I was hooked. Not an entrance, but an edifice. Form and function. I passed through the doors, and was not disappointed. Display cases of wood and glass, dimly lit. There was a remnant of a warm odor, like ‘old book smell.’ It must be the lignins. Quintessentially Victorian with exacting detail, it was perfect for curating and cataloguing. And for an old-school Hammer Horror film. Onward!
Must-See Exhibits at the Mütter
1. Einstein’s Brain
When Albert Einstein died in 1955, Dr. Thomas Harvey autopsied, removed, and kept the physicist’s brain. Eventually, Dr. Harvey dissected the revered brain into hundreds of slices, and dispersed the slides to many different pathologists all over the world.
The specimens on display at The Mütter Museum were received from Dr. Lucy B. Rorke-Adams, a Fellow at The College of Physicians of Philadelphia.
2. Hyrtl Skull Collection
Anatomist Joseph Hyrtl donated his collection of 139 skulls to The Mütter Museum in 1874. His purpose in collecting the skulls was to debunk the then-popular ‘science’ of phrenology, which claimed to determine an individual’s character traits from the size and shape of their skull. Hyrtl’s collection aimed to show anatomical variations in Caucasian Europeans of the time.
3. Chang and Eng Bunker Death Cast
Chang and Eng Bunker, arguably the most famous set of conjoined twins, inspired the term “Siamese Twins.” After touring extensively, Chang and Eng moved to North Carolina, became farmers, married sisters, and fathered 21 children between them.
When they died in 1874, Fellows from The College of Physicians conducted an autopsy and the specimens were sent to the museum. The Bunkers’ Death Cast and fused liver are on display.
4. Megacolon
This is big. I cannot even imagine how this patient looked, let alone walked upright, with extreme abdominal distension. So many questions: When the colon was extracted, how hard was it? Was the patient a man or a woman? How functional was the patient? How long did they have this condition? Did they get to the point where they just did not want to eat?
Again, difficult to imagine. My apologies for the lack of facts here, but in my zeal I neglected to take notes.
5. Babies and Fetuses
Sorry, no picture for this one, my fine readers; I’m drawing the good taste line here. If you must, Google it.
Jars and jars of babies and fetuses. My hardened sensibilities, built up from years of teaching in a public high school, were up to the challenge. My friend, a deep-feeling and hypersensitive soul, was done after the first display case in this section of the museum. No wanting to deal with a potential fainting scene, although it would have been an apropos Victorian cliché, we cut our visit short. Another day.
Why Mütter in an ‘art blog’?
Way before this point in the post, you may have been thinking: “This museum is fascinating and all, in a morbid sort of way, Kelly, but what’s the tie-in to art?”
For one, art and anatomy are inextricably intertwined, thanks to da Vinci. All of these suffering souls on display have been examined, observed, studied, analyzed, autopsied, collected, preserved, catalogued, curated and conserved. In a word, objectified. In a way, both the artist and the anatomist objectify their subjects in their work.
Two, physical suffering is a universal experience. Suffering, and the pain is causes, is something we all try to either alleviate or avoid altogether, sometimes at great cost. Many of the skulls in the Hyrtl collection belonged to individuals who were victims of suicide.
For me, The Mütter Museum is a mirror. As I pass display after display of their remains, I am simultaneously fascinated and repulsed. I have questions. How did some of these poor people make it through one day, let alone live their lives? How did they eat? How did they sleep? How did they earn a living? Did they ever laugh? And the final question: How much could I endure if I were in their circumstance?
Like powerful art, the Mütter is a direct hit to the solar plexus.
Need More Mütter?
- Just visit already! And what better time of year than creepily close to Halloween?
- View the museum’s YouTube Channel. Better yet, subscribe!
Day 10 down, 20 more to go!
30 Days to a Blog Challenge–Day 9
Day 9 of my personal challenge.
Yesterday, in my day 8 post, I discussed needing a way to keep track of my posts to avoid redundancy.
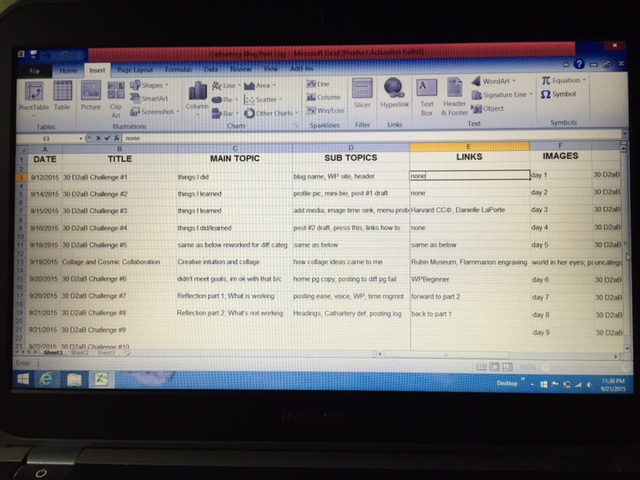
In that post, I also claimed I would create a spreadsheet Excel file to keep track of my data. This evening, I did create the file. Here’s what it looks like:
My apologies for the poor image. I have yet to learn how to do a screen shot; this was taken on my trusty iPhone 6. You should, however, be able to make out that I have included the following information regarding each post: posting date, post title, main topic, sub-topics, links, and images.
What you cannot see in the above image is that the Excel file also contains columns for categories, tags, and questions/comments. I am happy with the outcome; my Excel skills are rudimentary, but getting better through use.
I learned that since I am using predominantly text for my data, I needed to expand the cell width to avoid frustration. I chose 32 over the default 8.something. It is working fine for now, and will tweak it in the future if my needs change.
What solution(s) have you implemented to keep track of your blog posts?
Thanks for reading!
Day 9 down, 21 to go!
30 Days to a Blog Challenge–Day 8
Day 8 of my personal challenge. My one goal is an end of week reflection on the blogging process, continued.
Yesterday, in my Day 7 post, I reflected on what is working. Today, I will reflect on:
- What is not working, and for now, will change in some way
- Any questions I have
Let’s look at what is not working for me so far, or what I want to change:
First, the headings and sub headings thing. As a blogging beginner, I choose pure function over form. While still clearly a beginner, I am beginning to become bored with my headings. Yet, I know myself enough to realize if I abandon the format altogether, I will waste a ridiculous amount of time creating just the right header. I’m not cool with that. I know I’m entering a transition period as I move up the learning curve. I know that messiness and disorder is often a byproduct of this process. I don’t have a solution, so for now, I’m just riding the wave!
Second, ‘Cathartery’–what does that mean? I have yet to provide an explanation or definition for the term, either through the use of a tag line in the blog header itself, or elsewhere in my blog. It bugs me, I apologize, and I need to get that done this week. Again with the paralysis of perfection! At least I know myself.
Third, keeping track of what I’ve written and my questions. Since my posts are just entitled by number without a clue to content, after a week I’m struggling to remember what topics I’ve written in which post. For me, its a pain to keep toggling back and forth between screens. I think I’ll create a spreadsheet and include the date, title, big idea, and sub topics. I’ll also include any questions/challenges/inserted links. So, for example, an entry for today’s post would include: 9.21.15; 30D2aB#8; end of week reflection, what is not working; headings, Cathartery definition, remembering previous post topics, and link to Day 7 post. When I get the spreadsheet done, I’ll post a pic of it on my blog. Good idea, Win!
Any questions that I have
- What is the protocol for acknowledging a blog follower?
- What is the best way to thank them?
- How do blogs with a huge readership show their readers love and thanks without necessarily following them?
- Once the habit of posting is engrained, what is the next best thing to work on to ramp up my blog to the next level?
I think these are enough questions for now. Thanks for reading!
Day 8 down, 22 to go!
30 Days to a Blog Challenge–Day 7
Day 7 of my personal challenge. My one goal is an end of week reflection on the blogging process.
For my reflection format, I created several lists:
- What is working, and for now, will keep doing
- What is not working, and for now, will change in some way
- Any questions I have
I like the list format for analysis because its objective (ironic in an ‘art’ blog, I know), simple, and keeps me focused on the task at hand without getting sidetracked.
Let’s look at what is working for me so far:
First, the posting thing. While I wouldn’t use the word confident, I do feel comfortable with the process of posting. For now, I am keeping it simple. I copy a previous post, then change out the title and the image that appears at the beginning of a post. I write my post using the copied format, and insert any links if needed. I check or add a category, and insert any necessary tags. Then, I edit for clarity and content, and do a final manual proofread for spelling. Done and publish!
Second, consistency of voice. I am writing using my natural writing style, and not trying to change my voice at all. Looking back and re-reading my previous posts this week, I am pleased that my writing voice is consistent. When I am writing a new post, I do very little editing for writing style. Whew! One thing I don’t have to worry about!
Third, using WordPress. Again, to emphasize my statement from a previous post, anyone who claims you can have a blog up and running in 15 minutes has either done it countless times, or is outright lying. It took me about 4 days of fiddling with WP before I wrote my first post, and this week, I’m spending about 3-4 hours a day counting research time. So after about 2 weeks of using WordPress, I can comfortably create pages and menus, do basic appearance customization, and write and publish posts. Not a lot, but a lot for me!
Fourth, my writing schedule and personal time management. I get up early every day, between 5 and 6 am. This is when I do what I call my ‘hard’ writing–the kind that involves thinking. I basically have about 3 hours to myself before obligations to others kick in. If I finish a post in that window, I publish it. If not, I finish after 10pm, when my time belongs to me again. Otherwise, after 10pm, I am learning more about WP, researching, or creating. Still thinking, but thinking differently. I know that as my knowledge increases, the time I spend learning how to use WP for my needs will decrease, and my posting will become more efficient. This helps me to keep pushing through the grind when I feel tired or frustrated. So for now, my schedule is working.
I will address what is not working and questions I have in tomorrow’s post.
Day 7 down, 23 to go!
30 Days to a Blog Challenge–Day 6
Day 6 of my personal challenge. My goals today are:
- Figure out how to publish posts on different pages
- Write my copy for my static front page (home)
I did NOT manage to accomplish my goals today, and here is what I learned:
First, apparently, I cannot choose to publish posts on a particular page. I spent over 2 hours on the following: ‘playing around’ in WP admin trying to figure it out, reading WP support posts, and reading in the WP forums–all for naught. Finally, I googled “how to publish posts on a particular page in WordPress,” and, voila, found the WP Beginner site. Manna from Heaven! Their instructions and explanations are clear and concise, with videos. Even though I cannot choose on which page to publish individual posts, WP Beginner was awesome because I was informed up front, I didn’t have to figure it out through trial and error. I can’t do what I want, but my time wasn’t wasted because I found a great tool. Win!
Second, I’m not going to beat myself up if I don’t meet my goals. If I consciously choose to not do something, and I feel its the best decision at the time, I’m not going to attach any negative emotions to that choice. After spending over 2 hours to learn that I cannot choose a particular page to publish an individual post on, I decided to let the task of writing copy for my home page go. No guilt, no hating myself. My brain is just too damn tired at 1:52 in the morning. Adieu!
Day 6 down, 24 to go!
30 Days to a Blog Challenge–Day 4
Day 4 of my personal challenge. My goals today are:
- Write draft for second post
- Research ‘press this’
- Learn how to insert a link in a post
I did manage, again, to accomplish my goals today, and here is what I learned:
First, Sticking with my posting format for now is a win. Even better, I discovered ‘Copy a Post,’ which saves me even more time! Woot! Now, at 5 am, I can just think about what I am writing, and not think about format too. Utilizing ‘Copy a Post,’ I wrote the draft of post number 2. It worked out so well and so quickly that after proofreading, I hit ‘Publish’ right away. Woot #2!
Second, ‘Press This’ seems to be a must have for content curating. While I was reading topics relating to Writing and Editing under the Help section in WP, I clicked on ‘Press This.’ While I haven’t tried using it yet, I did manage to drop and drag it to my favorites bar. It took over 10 minutes, because first I had to figure out that I only had my ‘Command Bar’ activated. I had no idea I had different bars until in my frustration I right clicked on the bar and discovered I had 4 bars to choose from. Who knew? Obviously, not me.
Third, Linking with love is awesome! While I am new to blog writing, I’ve been reading blogs for years. I read blogs for information, to learn, to broaden my perspective. I don’t really read blogs to be primarily entertained. Links in posts are fantastic if they add more information, give backstory, etc. Read–useful. I wanted to be able to do that, so again, I researched ‘Links’ in the Help section of WP. Crazy easy to do! Another win!
Day 4 down, 26 to go!
30 Days to a Blog Challenge–Day 3
Day 3 of my personal challenge. My goals today are:
- Solve my ‘add media’ issues in my posts
- Solve my ‘wasting valuable time by looking for just the right free image’ issue
- fix my menu issues with WordPress via Help
I did manage, again, to accomplish my goals today, and here is what I learned:
First, It is much easier to insert the media first and then write the post, rather than the reverse. I wanted my text to begin under the image, not wrap around it. When I choose ‘no alignment’ to insert the image, I had to keep trying to move the text and it was a pain, so under the posts tab in WP Admin, I clicked ‘Add New’ and typed the same title, then inserted the image that was saved on my computer. After that, I just cut and pasted my text, and I was done. Publish. Woot!
Second, I learned very quickly that searching for just the right free and useable image for each post is a mammoth time waster. I knew if I used too much time doing this, then I would not be successful in completing the 30 Day Blog Challenge. That was just unacceptable. Solution? The Danielle LaPorte method, of course! Write the message on a sticky note, take a pic on my iPhone, and upload. Simple, efficient, and acceptable right now. Win!
Third, I wasted a lot of time trying to figure out the menu tabs thing. I created the pages I wanted in the order I wanted by dragging them. Little did I know I had to number them, too! After I figured that out, I couldn’t understand why what I was seeing under ‘menus’ (4 tabs) did not match up to what I was seeing under ‘view site’ (3 tabs). WTH? After over an hour of frustration, I finally went into help and actually READ about it. Sorry, 30 and under crowd, just ‘play with it and you’ll figure it out’ may work for you, but reading first is often more efficient. My truth. I mysteriously had created more than one menu, and was using the wrong one. Delete, problem solved.
Day 3 down, 27 to go!
30 Days to a Blog Challenge–Day 2
Day 2 of my personal challenge. My goals today are:
- Choose a profile picture
- Write a mini-bio
- Write draft for first post
I did manage, again, to accomplish my goals today, and here is what I learned:
First, Don’t agonize over your profile picture! I took several selfies because I had no one to take a picture of me at the time. I was unsatisfied with the results, so I used my default go-to picture that I like. This is my favorite picture because my happiness genuinely shines through. I wasted a lot of time trying to get a different picture just for the sake of not using the same old profile picture. A Lot. And Duh, I can change it later. The magic of edit.
Second, Writing a mini-bio is difficult. Its damn hard distilling the essence of you to 50 words or less, while simultaneously being interesting enough to keep your reader on your page for longer than 7 seconds. I didn’t want the mini-bio to be a mere list of accomplishments with a cute twist at the end about a pet. Overdone. I took the time to re-read and analyze 4 or 5 mini-bios that resonated with me, and then immediately wrote mine. While clearly at this point it needs tweaking, I am satisfied for now, and again, because edit.
Third, writing the actual post itself was fairly easy for me. Because the 30 Days to a Blog Challenge was indeed a challenge, I made a key decision about the posting format. Learning the technical aspects of blogging combined with time consumption was going to be the main challenge, so I wanted the actual writing to be easy to stay consistent and complete the challenge in said 30 days. The format for each of my 30 blog posts needed to be simple, straight-forward, and short. I chose three elements: listing daily goals, if goals were accomplished, and what I learned. At this stage I chose clarity and consistency over compelling. For now, I am glad I did.
Day 2 down, 28 to go!
30 Days to a Blog Challenge–Day 1
Today is day 1 of my personal challenge–create a blog in 30 days that meets the following criteria:
- Free, free, and free
- Decent enough to not embarrass the family
- Allows me to learn the basics of blogging
- Creates value for you by sharing what I learn
I created 3 goals to accomplish today:
- Create a name for the blog
- Set up a free WordPress site
- Create the header
I did manage to accomplish the above goals, and here is what I learned:
First, all of those blog posts floating around on the internet that promise you can create a blog in 15 minutes–its a damn lie! It took me more than 15 minutes just to create the name for the blog, because the name I wanted was taken.
Second, just because you read a lot of blogs doesn’t mean you understand the jargon when you go to create a blog. I opened two tabs in my browser, WP and Google, so I could create the blog name and the Gmail account at the same time to insure that the names were the same on both.
Third, it was really tough choosing one of the free themes in WP. I knew I could change it later, but I didn’t know how much time it would take to do that in the future if I had to move/adjust things. I settled on ‘Mystique’ for now. I wanted a theme that was responsive, simple, and could work as an art blog.
Fourth, It took time to create the header–about an hour and a half. I had to locate the images and save them on my computer, then edit them separately and then resave the edited versions on my computer. I used picmonkey’s free photoeditor to create the header. I chose collage, chose a facebook header type, then resized the header according to WP’s Mystique size recommendations, then played with it till I got it mostly the way I wanted it.
Day One down, 29 to go!


